If you are managing a single brand account, the Buffer dashboard is a masterpiece of simplicity. But if you are a high-volume creator, a headless agency, or a brand marketing lead overseeing twenty regional handles, the dashboard becomes a bottleneck. The manual overhead of uploading the same 9:16 vertical video to TikTok, Instagram Reels, and YouTube Shorts—while tweaking captions and hashtags for each—is a tax on your creative energy.
By the end of this guide, you will have the blueprint for a custom-built video distribution engine. We are moving away from the UI and into the world of headless social media management. You will learn how to programmatically push video assets from your cloud storage (like AWS S3 or Google Cloud) directly into the posting queues of every major social platform using the Buffer API.
Prerequisites for the Build
Before we touch a single line of code, ensure you have the following ready:
- A Buffer Business or Premium account: API access is restricted on lower tiers.
- Registered Buffer Application: You'll need a Client ID and Client Secret from the Buffer Developer portal.
- A Hosted Video Source: The API requires a public URL for your video files (e.g., a signed S3 link).
- Basic JSON/Python knowledge: We will use Python for our examples, though any language that handles HTTP requests will work.
TL;DR
- The Goal: Automate the cross-posting of vertical video assets across TikTok, Reels, and Shorts.
- The Tech: Buffer API + Python + Cloud Storage.
- The Result: A single trigger (like dropping a file in a folder) schedules native posts across all platforms simultaneously.
Step 1: Architecting your Headless Distribution Workflow
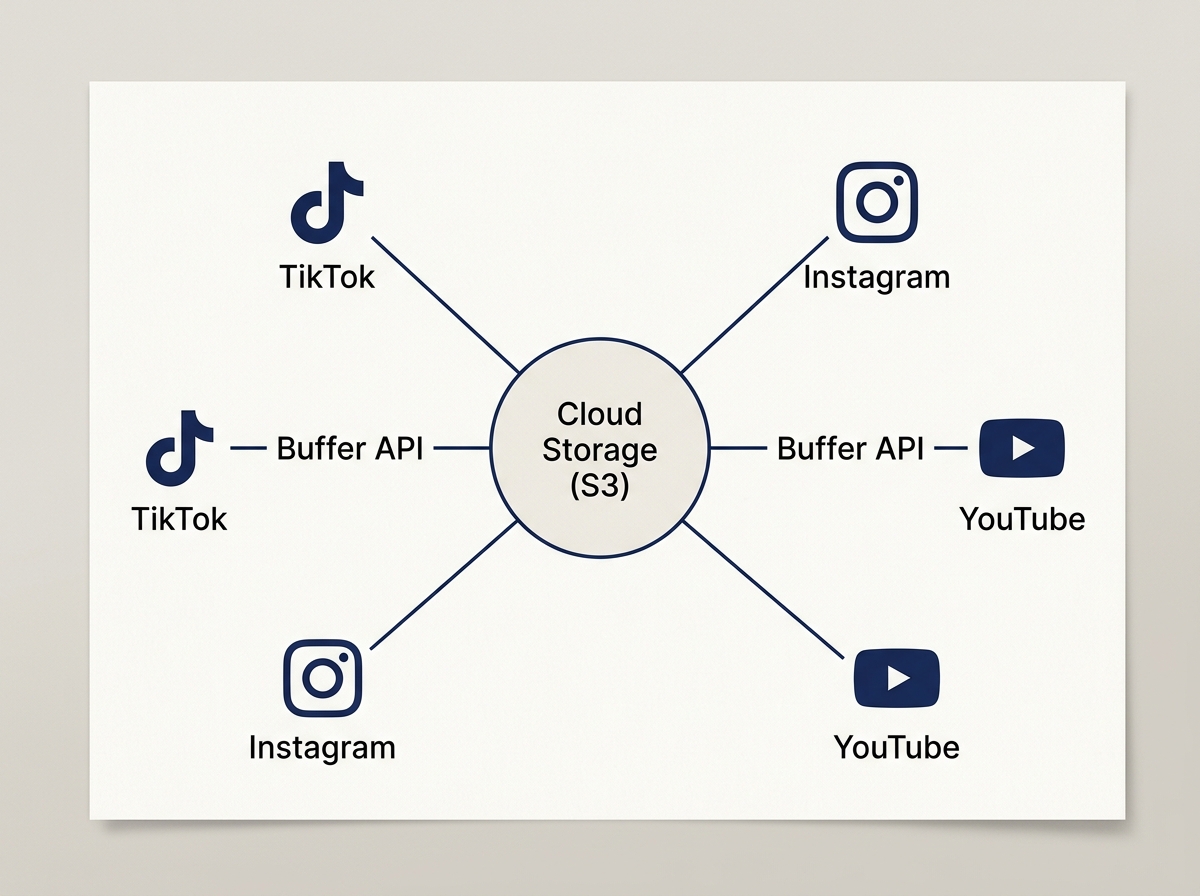
Most marketers think of social media management as a linear process: Create -> Upload -> Schedule. In a headless environment, we think in terms of a hub-and-spoke model. Your cloud storage is the hub; the Buffer API handles the spokes to the various social platforms.
Why does this matter? Because platform-specific nuances are shifting faster than ever. For instance, per [S5] TikTok Video Ad Specs and Best Practices for 2026, the demand for high-bitrate, native-feeling content has made manual compression a nightmare. A custom engine allows you to programmatically ensure every video meets these specs before it even hits the Buffer queue.
You aren't just sending a file; you are sending a payload of metadata. This includes your caption, your scheduled time, and platform-specific flags (like 'Allow Duet' on TikTok). By building this layer yourself, you bypass the friction of the web interface.
Common Pitfall: Trying to use local file paths. The Buffer API cannot 'see' a file on your laptop. You must provide a publicly accessible URL. If you're worried about privacy, use time-limited signed URLs from your cloud provider that expire after 24 hours.
Step 2: Authenticating and Mapping Profile IDs
Before you can post, you need to know where you're posting. Every social account connected to your Buffer account has a unique profile_id. You cannot guess these; you must fetch them programmatically.
First, obtain your Access Token via OAuth2. Once you have it, call the /profiles.json endpoint. This is the foundation of your engine. You will want to map these IDs to a local configuration file so your script knows that profile_id: 5f21... is your 'Main TikTok' and profile_id: 8b32... is your 'Brand Instagram'.
import requests

TOKEN = 'your_access_token'
response = requests.get(f'https://api.bufferapp.com/1/profiles.json?access_token={TOKEN}')
profiles = response.json()

for profile in profiles:
    print(f"{profile['service']}: {profile['id']}")
This step is critical for multi-brand agencies. If you are managing a creator-commerce platform—similar to the one NextTrip is building after acquiring YADA [S3]—you need a reliable way to route content to the correct creator handles without manual selection errors.
Common Pitfall: Forgetting that Instagram and Facebook require different profile IDs even if they are linked in Meta Business Suite. Treat every 'spoke' in your engine as a distinct entity.
Step 3: Constructing the Multi-Platform Video Payload
This is where the 'engine' part comes in. A single video file needs different 'wrapping' for different platforms.
- TikTok: Needs a focus on engagement hooks. According to [S1] and [S4], beauty influencer marketing and specific brand content types are dominating TikTok in 2026. Your API payload should include hashtags that trend in those specific niches.
- Instagram Reels: Requires a high-quality thumbnail (cover image). The Buffer API allows you to pass a
thumbnailparameter. Use it. - YouTube Shorts: Requires a title and a description.
Your script should take a single 'Master Object' and transform it into three distinct API calls to the /updates/create.json endpoint.
payload = {
    'profile_ids[]': ['profile_id_1', 'profile_id_2'],
    'text': 'Check out our latest tutorial! #martech #automation',
    'media[video]': 'https://your-s3-bucket.com/video.mp4',
    'media[thumbnail]': 'https://your-s3-bucket.com/cover.jpg',
    'scheduled_at': '2026-07-01T12:00:00Z'
}

Common Pitfall: Ignoring the shorten parameter. By default, Buffer might try to shorten links in your captions. For video-heavy platforms like TikTok, you usually want to keep your URLs clean or use specific tracking parameters. Set shorten: false in your API call to maintain control.
Step 4: Implementing Logic for TikTok Shop and Commerce
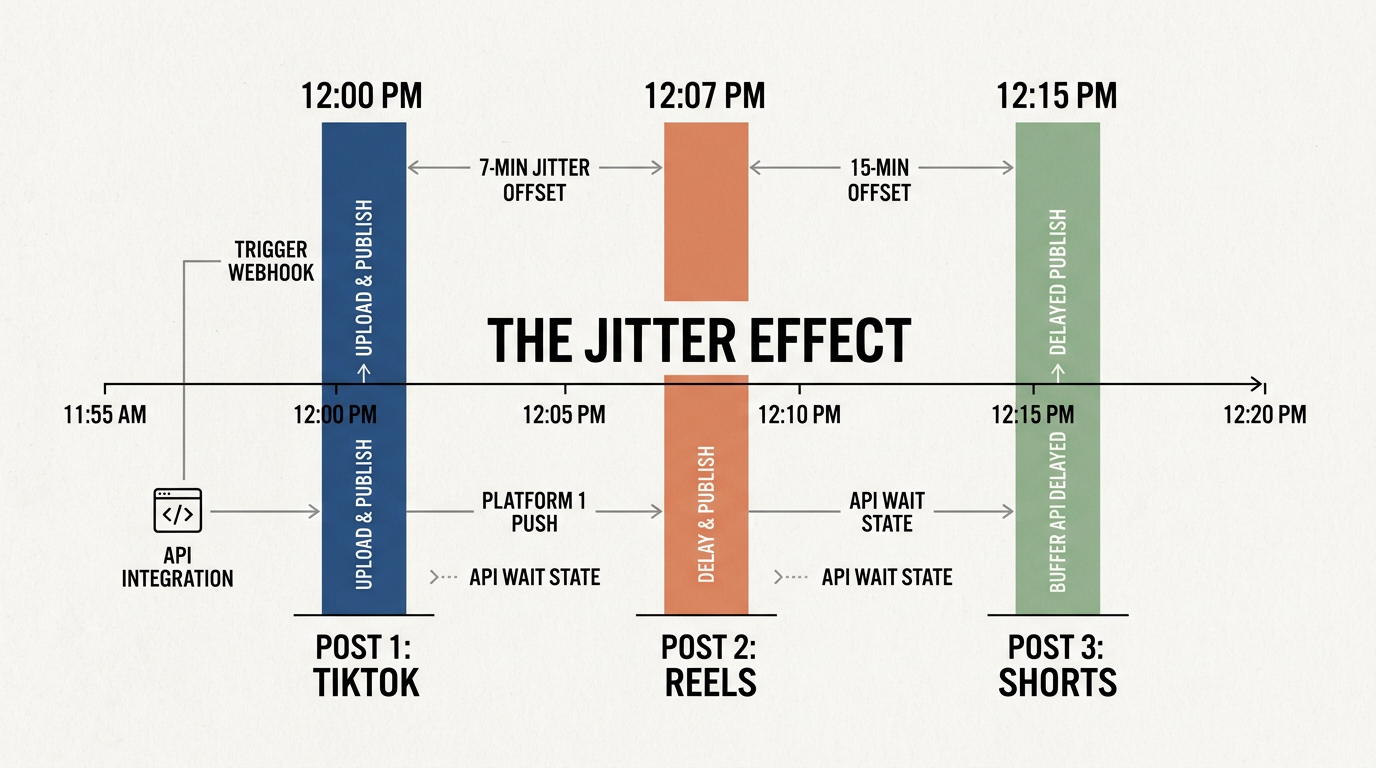
As we see in the 2026 landscape, particularly with the 'cold start' strategies for TikTok Shop [S2], timing and product tagging are everything. While the standard Buffer API handles the video delivery, your custom engine can be programmed to 'stagger' posts.
You don't want your Reels, Shorts, and TikToks to go live at the exact same second. It looks like bot behavior to the algorithms. Instead, build a 'jitter' into your engine. Program your script to add a random offset of 5 to 15 minutes between each platform's scheduled time. This makes the distribution look more organic to the platform's anti-spam filters.
Furthermore, if you are using TikTok Shop strategies, you can use the API to schedule posts that coincide with your inventory updates or flash sales, ensuring your 'social engine' is synced with your 'e-commerce engine'.
Common Pitfall: Over-scheduling. Just because you can automate 100 posts a day doesn't mean you should. Most platforms will shadowban accounts that exhibit high-frequency API posting without corresponding engagement. Maintain a human cadence.
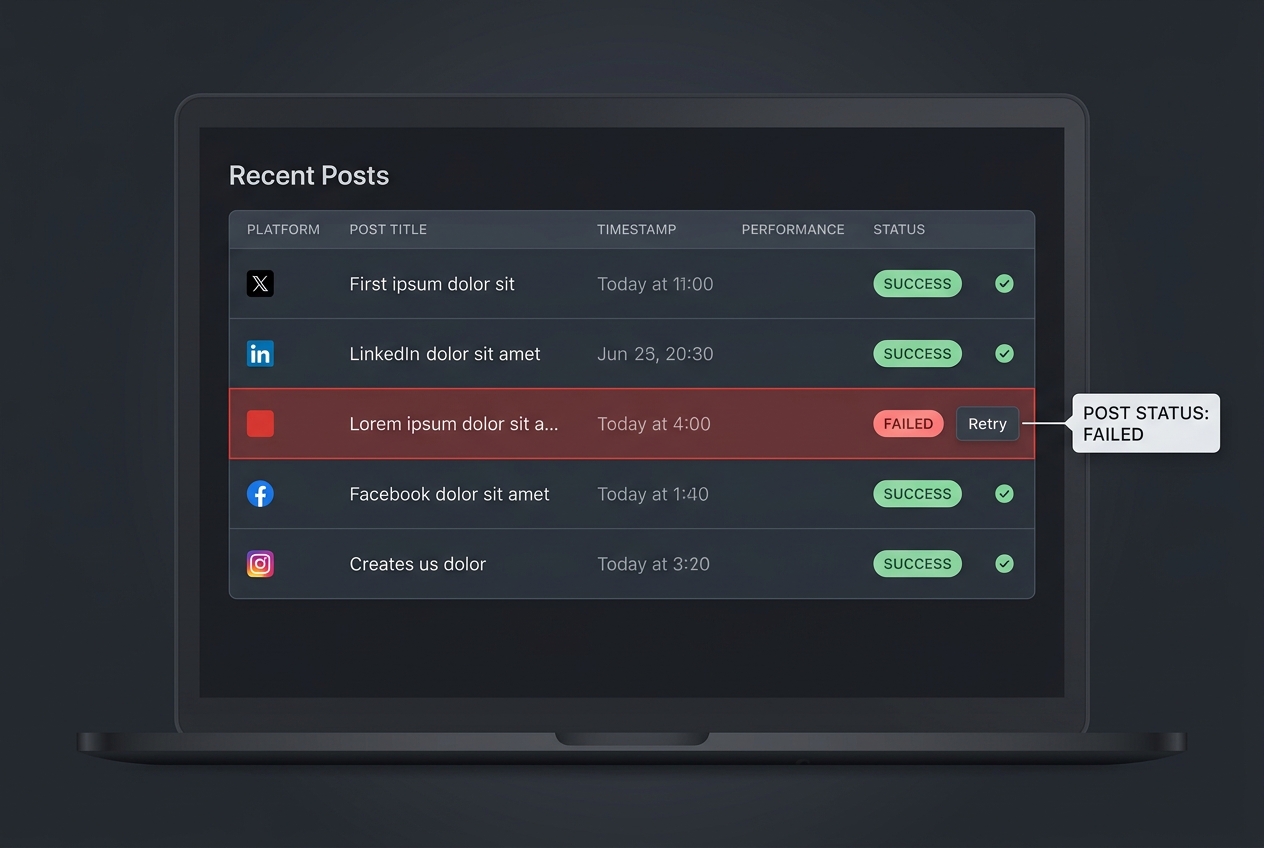
Step 5: Verification and Error Handling
How do you know it worked? The /updates/create.json call will return a success boolean and an array of updates. But 'success' at the API level only means Buffer accepted the job. It doesn't mean the video passed the platform's internal checks (e.g., copyright or resolution issues).
Your engine needs a 'Listener' or a 'Health Check' step.
- Log the Update IDs: Store the IDs returned by Buffer in a database (like Airtable or Supabase).
- Poll for Status: Every hour, have your script check the status of those IDs using the
/updates/{id}.jsonendpoint. - Alert on Failure: If an update moves to the
failedstate, send a notification to a Slack channel or Discord webhook.
This is the difference between a 'script' and an 'engine'. An engine manages its own failures. This is especially vital when dealing with the strict ad specs noted in [S5], where a slight encoding error can cause a silent failure on the platform side.
Verification Step: Once your script runs, log into the Buffer web dashboard. You should see your video in the 'Queue' for all selected profiles, with the correct thumbnails and scheduled times. If you see 'Processing' for more than 10 minutes, your video file size or format might be exceeding platform limits.
Three Related Tactics to Try Next
Once your basic engine is humming, you can extend it with these advanced workflows:
- Automated A/B Caption Testing: Use your engine to post the same video to two different 'test' accounts with different caption styles (e.g., one emoji-heavy, one text-heavy). Use the API to pull analytics 48 hours later to see which style drove a higher click-through rate.
- Dynamic Watermarking: Before sending the URL to Buffer, use a tool like Cloudinary or a Lambda function to overlay a platform-specific watermark (e.g., 'Follow us on TikTok' vs 'Subscribe on YouTube') onto the video file. This increases cross-platform conversion.
- AI-Generated Metadata: Integrate the OpenAI API into your engine. Feed it your video script and have it generate three different captions—one optimized for the TikTok algorithm, one for Instagram's aesthetic, and one for YouTube's SEO-heavy environment—before the payload is sent to Buffer.
By moving your workflow to the API, you aren't just saving time; you're building a proprietary asset. In a world where [INTERNAL: creator-commerce is becoming the standard -> creator-commerce-future], the winners will be those who spend less time clicking 'Upload' and more time refining their distribution logic.
FAQ